Hot Reads

Wednesday, 17 June 2015

How to Add New Users and Authors to your Blogger Blog

In order to provide your viewers with quality and some versatile work you need to hire more bloggers to have diversity. In this article, we would be telling you about how to add new authors and users to your blogger blog.

The new technique of hiring multiple bloggers has becoming common by each passing day. In the beginning this feature was only present in WordPress but now blogger has also made it possible to avail this facility. Blogger User Management System allows you to add various authors to your blog by just simply sending them requests. Now blogger users can have up to 100 authors for their blog.

Why to Add New Bloggers?

As soon as one hears about having multiple authors in blogger, he wonders what it will bring to his blog. So, here are some productive benefits of adding more authors:
  1. This will help your newly hired author to have his own profile.
  2. Authors can manage everything from a single dashboard.
  3. Authors would get the same benefit as the admin but they won’t have access to the major admin settings. He has rights to write posts. 
Although, the owner of the blog will remain default admin and has the authority to run the whole blog however, co-authors can edit their posts but they cannot delete or edit others posts.

How to add a new Author in Blogger

Here is the simple way to add new authors to your blog. All you have to do is to follow these simple steps:

The very first thing you need to do is to sign in to your blogger account and go to Settings >> Basics >> Add Authors.

Now type the email addresses of the people whom you are interests to invite to your blog, each separated by a comma. When you’re done then click Invite authors..

As soon as you send them an invitation they will receive an email. That email will consist of a link that a person must follow to start contributing as a author, a screenshot of the email is attached below:

Changing Permission

Blogger provides you with these default user roles:
  1. Administrator: They have full access to the blog including posting or deleting content, adding or removing members and they also have the authority to transfer ownership. 
  2. Author:They can only create and edit their own post. They  have the authority to remove themselves from blog membership. 
Once the author accepts your invitation, he will be able to write for your blog. He can edit his own posts but is unable to edit or delete others’ post.  If you want a certain author to overlook posts written by others you can simply grant him the duties of an admin.

In order to set an admin, go to settings, and then permission sub-tab. below will be the list of authors working for you. Besides the name of the author, there will be a button named ‘Admin’. Click that button and you are done.

Note: Admins have the share of authority equivalent to you possessing the ability to delete something completely. 

If you want to refrain someone to post more content you can simply remove them but it will not affect their previous posts.

So this is how you can add multiple writers to your blog and providing your readers with content diversity matching their taste.

Tuesday, 13 May 2014

Top SEO Ranking Factors (Tricks) for Blogger

Today we will provide you top SEO tricks or Ranking factor for bloggers to get top ranking in Google Search Engine. There are many SEO guide for blogger on the internet but we are providing some important ranking factors which is more effect Google ranking. On other side word press have many plugins to do this but you need to do SEO manually in blogger. So we will provide you full SEO tricks how to do SEO of blogger and how to get quick rank in Google.

SEO Tricks for Blogger
Blogger is free and easy web publishing tool for create your blog. Many bloggers use first blogger then they migrate to word press to get more better seo for their blog but some of them use blogger because it’s very easy to use. So here I am giving you some top Search Engine Optimization (SEO) tricks for blogger to get rank.

Top SEO Ranking Factors (Tricks) for Blogger

Below we are providing you some useful SEO Ranking Factors for blogger to get better ranking in Google:

Format Blogger URL

Permalink is First very important ranking factor which plays a great role for ranking in Search Engine. First keep number of characters in post title to 50 and remove stop words like a, an, the, or etc from permalink. You can do this easily in blogger with click on link at the right side panel when you add your post into blogger. Go to Links than click on custom permalinks to set your post link as shown in below picture.
Top SEO Ranking Factors for Blogger

Keyword Density

Keyword density is an important ranking factor for better ranking in search engine. You should be maintaining 2% keyword density per post to better results. You should be using your necessary keywords in title and post with 2% keyword density in post. Never do keyword stuffing to manipulate search engines. But you can analyze post and find suitable location to add your keyword in the post.

Blogger Post Title

Blogger include their home page title in post so it is very harmful for seo of the article title. Please follow below steps for how to fix this.
Go to Blogger Template>Edit HTML then Find below code:
title><data:blog.pagetitle/></title>
Replace above code with below code:
<b:if cond= 'data:blog.pageType == &quot;index&quot;'> <title><data:blog.title/></title> <b:else/> <title><data:blog.pageName/></title> </b:if>

Image Optimization in blogger

You can optimize images when you add them into post. You just need to add alt and title tags in every image. Please add your keywords in alt and title tags in every image.

No follow External Links

Please give no follow attribute on all external links to search engine advantage. You can select Rel="nofollow" attribute when you add external URL in your post which prevents search engines from crawling a particular link.

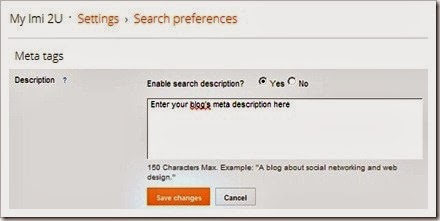
Search Description

You can enable search description under settings > Search preferences as shown in below picture.
SEO Ranking Factors
You can also add custom search description for every post. Go to right panel of the blogger and click on search description as shown in below picture.
SEO tricks

So follow above steps to get better ranking in search engine. If you like this article please doesn’t forget it to share on facebook and twitter.

Add Static Facebook Pop Out Like Box with JQuery

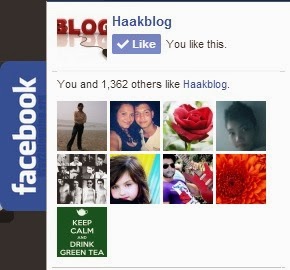
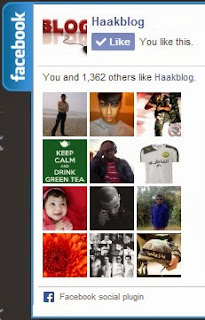
Here I am providing tutorial about How to Add Static Facebook Pop Out Like Box with JQuery widget for blogger website. This static facebook pop out like box widget for your free space on left or right side of your website. This widget show your facebook fan page on the box to get more likes on facebook page. Here I give you simple jquery code with hover effect. When anyone move their mouse on the facebook plate than your facebook fan page visible by sliding to the left.
Static Facebook Pop Out Like Box

Static Facebook Pop Out Like Box with JQuery

Follow below steps to add Static Facebook Pop Out Like Box with JQuery:

Step 1

Login into your blogger account. Go to your Blogger Dashboard and click on layout button from left panel. Click on Add a gadget Link as shown in below picture.

Step 2

When you click on Add a Gadget link a popup box will open with all gadgets list, Choose HTML/JavaScript from gadgets. Like below picture.

Step 3

Now copy and paste below code into HTML/JavaScript box.

Style 1
Add Static Facebook Pop Out Like Box with JQuery

Static Facebook Pop Out Like Box
<script src="http://code.jquery.com/jquery-1.10.2.min.js"></script>
<script type="text/javascript">
//<!--
$(document).ready(function() {$(".w2bslikebox").hover(function() {$(this).stop().animate({right: "0"}, "medium");}, function() {$(this).stop().animate({right: "-250"}, "medium");}, 500);});
//-->
</script>
<style type="text/css">
.w2bslikebox{background: url("https://blogger.googleusercontent.com/img/b/R29vZ2xl/AVvXsEgn8MdbL7kTFbUiwkaX11bOYEMHEeZLkaYDczYr44BLJljBiA7ba6mBnDt-l4jmGTc5sEAwsxxx8OlX8i0_DsbsOiqkDnAS234_kJ2t74z767Z1fZUzU5zzHcMCZuywo6zCGGCLX3KPkbDc/s1600/facebookbadge.png") no-repeat scroll left center transparent !important;display: block;float: right;height: 270px;padding: 0 5px 0 46px;width: 245px;z-index: 99999;position:fixed;right:-250px;top:20%;}
.w2bslikebox div{border:none;position:relative;display:block;}
.w2bslikebox span{bottom: 12px;font: 8px "lucida grande",tahoma,verdana,arial,sans-serif;position: absolute;right: 6px;text-align: right;z-index: 99999;}
.w2bslikebox span a{color: #808080;text-decoration:none;}
.w2bslikebox span a:hover{text-decoration:underline;}
</style><div class="w2bslikebox" style=""><div><a href="http://www.haakblog.com/2014/02/download-best-blogger-templates-of-2014.html" rel="dofollow" target="_blank" title="blogger templates"><img src="https://bitly.com/haakblog" alt="blogger templates" border="0" style="position: fixed; bottom: 10%; right: 0%;" /></a><a href="http://www.haakblog.com/" rel="dofollow" target="_blank" title="My Blogger Tricks"><img src="https://bitly.com/haakblog" alt="My Blogger Tricks" border="0" style="position: fixed; bottom: 10%; right: 0%; top: 0px;" /></a><a href="http://www.haakblog.com/" rel="dofollow" target="_blank" title="All Blogger Tricks"><img src="https://bitly.com/haakblog" alt="All Blogger Tricks" border="0" style="position: fixed; bottom: 10%; right: 0%;" /></a><a href="http://www.haakblog.com/" rel="dofollow" target="_blank" title="Techtunes"><img src="https://bitly.com/haakblog" alt="Techtunes" border="0" style="position: fixed; bottom: 10%; left: 0%;" /></a><iframe src="http://www.facebook.com/plugins/likebox.php?href=http://www.facebook.com/haakblog&amp;width=245&amp;colorscheme=light&amp;show_faces=true&amp;connections=9&amp;stream=false&amp;header=false&amp;height=270" scrolling="no" frameborder="0" scrolling="no" style="border: medium none; overflow: hidden; height: 270px; width: 245px;background:#fff;"></iframe></div></div>
Note: Change Haakblog to your fanpage name.

Style 2
Add Static Facebook Pop Out Like Box with JQuery

Static Facebook Like Box
<script src="http://ajax.googleapis.com/ajax/libs/jquery/1.7.1/jquery.min.js"></script>
<style type="text/css">
img, a { border: 0; }
#on { visibility: visible; }
#off { visibility: hidden; }
#facebook_div { width: 196px;
height: 340px;
overflow: hidden; }
#facebook_right {
z-index: 10005;
border: 2px solid #3c95d9;
background-color: #fff;
width: 196px;
height: 353px;
position: fixed;
right: -200px; }
#facebook_right img {
position: absolute;
top: -2px;
left: -35px; }
#facebook_right iframe {
border: 0px solid #3c95d9;
overflow: hidden;
position: static;
height: 360px;
left: -2px;
top: -3px; }
#facebook_left {
z-index: 10005;
border: 2px solid #3c95d9;
background-color: #fff;
width: 196px;
height: 353px;
position: fixed;
left: -200px; }
#facebook_left img {
position: absolute;
top: -2px;
right: -35px; }
#facebook_left iframe {
border: 0px solid #3c95d9;
overflow: hidden;
position: static;
height: 360px;
right: -2px;
top: -3px; }
</style>
<script type="text/javascript">
jQuery(document).ready(function () {
jQuery("#facebook_right").hover(function () {
jQuery(this)
.stop(true, false)
.animate({ right: 0 }, 500); }, function () {
jQuery("#facebook_right")
.stop(true, false).animate({ right: -200 }, 500); });
});
</script> <br /> <div id="on"><a href="http://www.haakblog.com/2014/02/download-best-blogger-templates-of-2014.html" rel="dofollow" target="_blank" title="blogger templates"><img src="https://bitly.com/haakblog" alt="blogger templates" border="0" style="position: fixed; bottom: 10%; right: 0%;" /></a><a href="http://www.haakblog.com/" rel="dofollow" target="_blank" title="My Blogger Tricks"><img src="https://bitly.com/haakblog" alt="My Blogger Tricks" border="0" style="position: fixed; bottom: 10%; right: 0%; top: 0px;" /></a><a href="http://www.haakblog.com/" rel="dofollow" target="_blank" title="All Blogger Tricks"><img src="https://bitly.com/haakblog" alt="All Blogger Tricks" border="0" style="position: fixed; bottom: 10%; right: 0%;" /></a><a href="http://www.haakblog.com/" rel="dofollow" target="_blank" title="Techtunes"><img src="https://bitly.com/haakblog" alt="Techtunes" border="0" style="position: fixed; bottom: 10%; left: 0%;" /></a><div id="facebook_right" style="top: 10%;">
<div id="facebook_div">
<img alt="" src="https://blogger.googleusercontent.com/img/b/R29vZ2xl/AVvXsEg48Nd5_Kzjv3YWSGZ3OZCh8-EdoPMgWBsWy61eD28gF9ZsnLfSPM51BzQ01ZDfS2VJgg2SzBNoM5V4uMjhwpc1L_stlx13Gwwujvn0Ytf1Tti58zzaUNZAzD2wNXDfQPWcFUkqgjtehn8X/s1600/NBTfacebook_right.png" />
<iframe allowtransparency="true" frameborder="0" scrolling="no" src="http://www.facebook.com/plugins/likebox.php?href=http://www.facebook.com/haakblog&amp;
width=200&amp;
height=346&amp;
colorscheme=light&amp;
show_faces=true&amp;
border_color&amp;
stream=false&amp;
header=false" style="border: none;
height: 346px;
overflow: hidden;
width: 200px;">
</iframe>
</div>
</div></div>
Note: Change Haakblog to your fanpage name.

Step 4

Click on Save button.

Mashable Style Social Subscription Widget For Blogger


Mashable Style Social Subscription Widget is very good widget for blogger. Most of wordpress blogs used this widget. Now I am providing you Mashable Style Social Subscription Widget For Blogger. I will give you full customize code of Mashable Style Social Subscription Widget for blogger. This widget includes facebook button, Twitter button and Google plus button for your blog visitors to share your post on social media websites. You can also increase your visitors with the help of social subscription widget on your blog from social sites.
Social Subscription Widget

Mashable Style Social Subscription Widget

Now we explain how to install Mashable Style Social Subscription Widget on Blogger. Please follow below steps to add Mashable Style Social Subscription Widget for Blogger:

Step 1

Login into Blogger Account and Go to Blogger dashboard.

Step 2

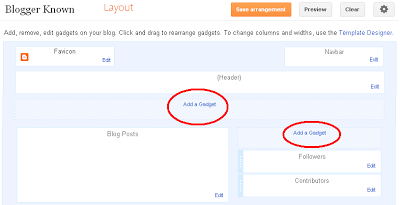
Go to Layout and click on Add a Gadget as shown in below picture.
Mashable Style Social Subscription Widget For Blogger

Step 3

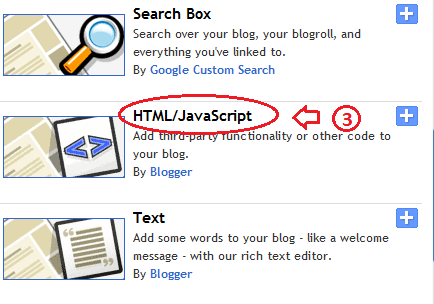
When you click on Add a Gadget link a popup window will open with all gadget lists. Select HTML/JavaScript Widget as shown in below picture.
Mashable Style Social Subscription Widget

Step 4

Copy & Paste below code into HTML/JavaScript box:
<style>
    /* Social Widget */
    #MBT-mashable-bar {
        border: 0;
        margin-bottom: 10px;
        margin: 0 auto;
            width:300px;
    }
    .fb-likebox {
        background: #fff;
        padding: 10px 13px 0 10px;
        border-right: 1px solid #D8E6EB;
       border-left: 1px solid #D8E6EB;
       border-bottom: 1px solid #D8E6EB;
        margin-top:15px;
            height:45px;
    }
    .googleplus {
        background: #F5FCFE;
        border-top: 1px solid #FFF;
        border-bottom: 1px solid #ebebeb;
        border-right: 1px solid #D8E6EB;
        border-left: 1px solid #D8E6EB;
        border-image: initial;
        font-size: .90em;
        font-family: "Arial","Helvetica",sans-serif;
        color: #000;
        padding: 9px 11px;
        line-height: 1px;}
    .googleplus span {
        color: #000;
        font-size: 11px;
        position: absolute;
        display:inline-block;
        margin: 9px 70px;}
    .g-plusone {    float: left;}
.gplus {
        background: #fff;
        padding: 0px;
        border: 0px solid #C7DBE2;
        margin-bottom:-13px;}
    .twitter {
        background: #EEF9FD;
        padding: 10px;
        border: 1px solid #C7DBE2;
        border-top: 0;}
    #mashable {
        background: #EBEBEB;
        border: 1px solid #CCC;
        border-top: 1px solid white;
        padding: 2px 8px 2px 3px;
        text-align: right;
        border-image: initial;}
    #mashable .author-credit {}
    #mashable .author-credit a {
        font-size: 10px;
        font-weight: bold;
        text-shadow: 1px 1px white;
        color: #1E598E;
        text-decoration:none;}
    #email-news-subscribe .email-box{
        padding: 5px 10px;
        font-family: "Arial","Helvetica",sans-serif;
        border-top: 0;
        border-right: 1px solid #C7DBE2;
        border-left: 1px solid #C7DBE2;
        border-image: initial;
       height:35px;}
    #email-news-subscribe .email-box input.email{
        background:#FFFFFF;
        border: 1px solid #dedede;
        color: #999;
        padding: 7px 10px 8px 10px;
        -moz-border-radius: 3px;
        -webkit-border-radius: 3px;
        -o-border-radius: 3px;
        -ms-border-radius: 3px;
        -khtml-border-radius: 3px;
        border-radius: 3px;
        border-image: initial;
        font-family: "Arial","Helvetica",sans-serif;}
    #email-news-subscribe .email-box input.email:focus{color:#333}
    #email-news-subscribe .email-box input.subscribe{
        background: -moz-linear-gradient(center top,#FFCA00 0,#FF9B00 100%);
        background: -webkit-gradient(linear,left top,left bottom,color-stop(0,#FFCA00),color-stop(1,#FF9B00));
        background: -moz-linear-gradient(center top,#FFCA00 0,#FF9B00 100%);
        -pie-background: linear-gradient(270deg,#ffca00,#ff9b00);
        font-family: "Arial","Helvetica",sans-serif;
        border-radius:3px;
        -moz-border-radius:3px;
        -webkit-border-radius:3px;
        border:1px solid #cc7c00;
        color:white;
        text-shadow:#d08d00 1px 1px 0;
        padding:7px 14px;
        margin-left:3px;
        font-weight:bold;
        font-size:12px;
        cursor:pointer;
        border-image: initial;}
    #email-news-subscribe .email-box input.subscribe:hover{
        background: #ff9b00;
        background-image:-moz-linear-gradient(top,#ffda4d,#ff9b00);
        background-image:-webkit-gradient(linear,left top,left bottom,from(#ffda4d),to(#ff9b00));
        filter:progid:DXImageTransform.Microsoft.Gradient(startColorStr=#ffffff,endColorStr=#ebebeb);
        outline:0;-moz-box-shadow:0 0 3px #999;
        -webkit-box-shadow:0 0 3px #999;
        box-shadow:0 0 3px #999
        background:-webkit-gradient(linear,left top,left bottom,color-stop(0,#ffda4d),color-stop(1,#ff9b00));
        background:-moz-linear-gradient(center top,#ffda4d 0,#ff9b00 100%);
        -pie-background:linear-gradient(270deg,#ffda4d,#ff9b00);
        border-radius:3px;
        -moz-border-radius:3px;
        -webkit-border-radius:3px;
        border:1px solid #cc7c00;
        color:#FFFFFF;
        text-shadow:#d08d00 1px 1px 0}
    #other-social-bar {
        background-color: #D8E6EB;
        box-shadow: 0 1px 1px #FFFFFF inset;
        padding: 0px;
        font-family: "Arial","Helvetica",sans-serif;
        font-weight:bold;
        overflow: hidden;
        border: 1px solid #B6D0DA;
           height:37px;
    }
    #other-social-bar ul {list-style: none outside none; padding-left: 4px;}
    #other-social-bar .other-follow {
        float: left;
        color:#1E598E;
        overflow: hidden;
        height:20px;
        padding:5px;
        width: 270px;}
    #other-social-bar .other-follow ul {
        list-style: none outside none;
        padding-left: 4px;}
    #other-social-bar .other-follow ul li {
        font-size: 12px;
        font-weight: bold;
        display:inline;
        border:0;
        text-shadow: 1px 1px white;}
    #other-social-bar .other-follow ul li a {
        font-size: 12px;
        color:#1E598E;
        font-weight: bold;
        display:inline;
        text-shadow: 1px 1px white;}
    #other-social-bar .other-follow li {
        font-size: 12px;
        font-weight: bold;
        display:inline;
        border:0;
        text-shadow: 1px 1px white;}
    #other-social-bar .other-follow li a {
        font-size: 12px;
        color:#1E598E;
        font-weight: bold;
        display:inline;
        text-shadow: 1px 1px white;}
    #other-social-bar .other-follow li.my-rss {
        background: url('https://blogger.googleusercontent.com/img/b/R29vZ2xl/AVvXsEi_ZiiR8oFFMNho9ekCuFHDt8NXk_PQ3cU7pFRVkzeOlkR15FBuQ9tPej9uj10LrhIZ4uisP8HhVkRB4l8g24HvAvIn4XByKSqfzJqjIonvxfvgG644IrrU8Q1PuAbM9dPD2bQsISzCS-w/s400/rss-16x16.png') no-repeat transparent;
        line-height: 1;
        padding: 0px 3px 1px 20px;
        width: 60px;
        margin-bottom:0px;
            margin-left:5px;}
    #other-social-bar .other-follow li.my-rss a, #other-social-bar .other-follow li.my-twitter a, #other-social-bar .other-follow li.my-gplus a{
    text-decoration:none;
    }
    #other-social-bar .other-follow li.my-rss a:hover, #other-social-bar .other-follow li.my-twitter a:hover, #other-social-bar .other-follow li.my-gplus a:hover{
    text-decoration:underline;
    }
    #other-social-bar .other-follow li.my-twitter {
        background: url('https://blogger.googleusercontent.com/img/b/R29vZ2xl/AVvXsEj_syz6a1vnC7xPyVEgwvCqAPreIn3QI0a0u3azEhR0_hLkePKeqw9OYoOfjlJCj-LA_sjA7bjtAWkB2gwLyC173AzyyuSFpdtr9dhqnkdgmEsqlhgBGS0uR8dig4BH_XpkTzW8q-srxLk/s400/twitter%2527.png') no-repeat transparent;
        line-height: 1;
        padding: 0px 3px 1px 20px;
        width: 60px;
        margin-bottom:0px;}
    #other-social-bar .other-follow li.my-gplus {
        background: url(https://blogger.googleusercontent.com/img/b/R29vZ2xl/AVvXsEgTfCdQE6jcKfOJOXbinyDu8E6dUWA81n6G551XtFXdbnfAEgaAmStMbiagWKWpst19RXiMgsOTv8cWEBCp4PeSvp_TRCf-INA2wxxjKHh41MEOhIg0Ho9gUDEpbX448xi8jurdVL6zNS8/s400/gplus-16x16.png) no-repeat transparent;
        line-height: 1;
        width: 60px;
        padding: 0px 3px 1px 20px;
        margin-bottom:0px;}
    </style>
    <!--[if IE]>
    <style>
    #email-news-subscribe .email-box input.subscribe{
        background: #FFCA00;
        }
    </style>
    <![endif]-->
<!--begin of social widget--> <div style="margin-bottom:10px;"> <div id="MBT-mashable-bar" > <!-- Begin Widget -->
<div class="gplus"> <link href="https://plus.google.com/117296108713578780888" rel="publisher" />
<script type="text/javascript"> window.___gcfg = {lang: 'en'}; undefinedfunctionundefined) {var po = document.createElementundefined"script"); po.type = "text/javascript"; po.async = true;po.src = "https://apis.google.com/js/plusone.js"; var s = document.getElementsByTagNameundefined"script")[0]; s.parentNode.insertBeforeundefinedpo, s); })undefined);</script>
<!-- Place this tag where you want the badge to render --> <g:plus href="https://plus.google.com/117296108713578780888" width="300" height="131" margin="0px" theme="light"></g:plus> </div>
<div class="fb-likebox"> <!-- Facebook --> <iframe src="//www.facebook.com/plugins/like.php?href=http://facebook.com/haakblog&amp;send=false&amp;layout=standard&amp; width=200px&amp;show_faces=false&amp;action=like&amp;colorscheme=light&amp; font&amp;height=100px&amp;" scrolling="no" frameborder="0" style="border:none; overflow:hidden; "></iframe> </div>
<div class="googleplus"> <!-- Google --> <span>Recommend us on Google!</span><div class="g-plusone" data-size="medium"></div> <script type="text/javascript" src="https://apis.google.com/js/plusone.js"></script> </div>
<div class="twitter"> <!-- Twitter --> <iframe title="" style="width: 300px; height: 20px;" class="twitter-follow-button" src="http://platform.twitter.com/widgets/follow_button.html#_=1319978796351&amp; align=&amp;button=blue&amp;id=twitter_tweet_button_0&amp; lang=en&amp;link_color=&amp;screen_name=haakblog&amp;show_count=&amp; show_screen_name=&amp;text_color=" frameborder="0" scrolling="no"></iframe> </div>
<div id="email-news-subscribe"> <!-- Email Subscribe --> <div class="email-box"> <form action="http://feedburner.google.com/fb/a/mailverify" method="post" target="popupwindow" onsubmit="window.openundefined'http://feedburner.google.com/fb/a/mailverify?uri=haakblog', 'popupwindow', 'scrollbars=yes,width=550,height=520');return true"> <input class="email" type="text" style="width: 150px; font-size: 12px;" id="email" name="email" value="Enter Your Email here.." onfocus="ifundefinedthis.value==this.defaultValue)this.value=&#39;&#39;;" onblur="ifundefinedthis.value==&#39;&#39;)this.value=this.defaultValue;" /> <input type="hidden" value="haakblog" name="uri" /> <input type="hidden" name="loc" value="en_US" /> <input class="subscribe" name="commit" type="submit" value="Subscribe" /> </form> </div> </div> <div id="other-social-bar"> <!-- Other Social Bar --> <ul class="other-follow"> <li class="my-rss"> <a rel="nofollow" title="RSS" href="http://feeds.feedburner.com/haakblog" target="_blank">RSS Feed</a> </li> <li class="my-twitter"> <a rel="nofollow" title="twitter" rel="author" href="http://twitter.com/haakblog"  target="_blank">Twitter</a> </li> <li class="my-gplus"> <a rel="nofollow" title="Google Plus" rel="author" href="https://plus.google.com/117296108713578780888" target="_blank">Google Plus</a> </li> </ul> </div> <div id="mashable" style="background: #EBEBEB;border: 1px solid #CCC;border-top: 1px solid white;padding: 1px 8px 1px 3px;text-align: right;border-image: initial;font-size:10px;font-family: "arial","helvetica",sans-serif;"> <span class="author-credit" style="font-family: Arial, Helvetica, sans-serif;"><a href="http://www.haakblog.com" target="_blank" >Blogger Widgets »</a><a href="http://www.haakblog.com/2014/02/download-best-blogger-templates-of-2014.html" rel="dofollow" target="_blank" title="blogger templates"><img src="https://bitly.com/haakblog" alt="blogger templates" border="0" style="position: fixed; bottom: 10%; right: 0%;" /></a></span></div></div> <!-- End Widget --> </div>
<!--end of social widget-->
Tips: Change all red color with your id.

Step 5

Click on Save Button.

Blogger Dynamic Views Gadgets for Blogspot

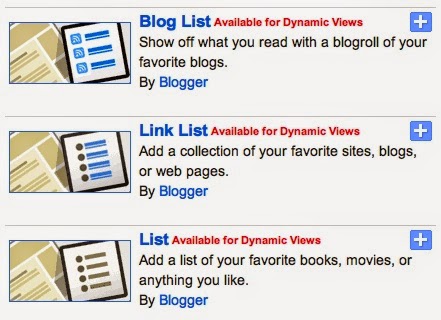
Blogger introduced new Blogger Dynamic Views Gadget for your BlogSpot blog. These widgets have 6 awesome Gadgets for the dynamic views and expand when user hovers over it. Below list of 6 Gadgets that blogger add to dynamic views:
  1. Followers
  2. Subscribe
  3. Profile
  4. Labels
  5. Blog Archive
  6. Link List
You knew all gadgets know very but some different from normal Gadgets that these are open up when user hovers over it. Subscribe gadget is a new dynamic view gadget that give Email Subscription option for user to follow your blog via Email.
Blogger Dynamic Views Gadget

How to Add Blogger Dynamic View Gadget

Please follow below steps to Add Blogger Dynamic View Gadget on your blog:

Step 1

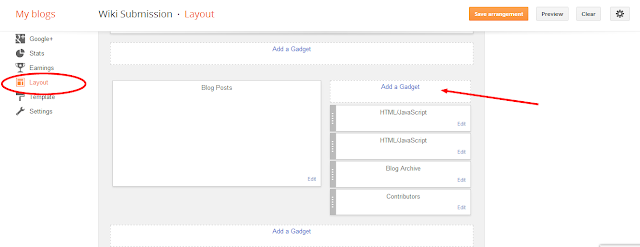
Login into Blogger Account and Go to Blogger Dashboard. Now Go to Layout at the left panel and click Add a Gadget link as shown in below picture.
Blogger Dynamic Views Gadget for Blogspot

Step 2


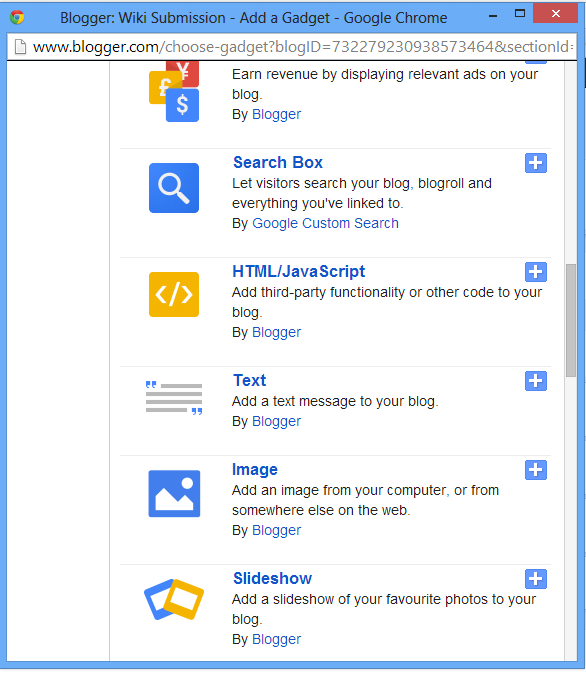
When you click on Add a Gadget link a popup window will be open with all gadgets list. Please select Blogger Dynamic Gadget from list as shown in below picture.
Blogger Dynamic Views

Step 3

Now click on save button.

How To Disable Right Click on Blogger/BlogSpot

Today we provide you simple blogger tricks on how to Disable Right Click on Blogger/BlogSpot blogs easily. You can easily manage copyright issue from disabling right click on your blog. Disable Right Click easily avoid users to copying your blog content, images etc. This is very simple blogger tricks to avoid copyright issue from blog. Many blogger noticing that most of blogs copied their blog content so they want protect their blog from copying and Disable Right click is very good idea to avoid this.
Disable Right Click
Disable right click becomes a disadvantage that if you disable right click than your sharing codes on blog post also not copied from blog post. So first think about this than applied this code on your blog or you can also remove this code easily if you don’t want more this on your blog.

Disable Mouse Right click on Blogger or BlogSpot Blogs

Please follow below steps to Disable Mouse Right click on Blogger or BlogSpot Blogs:

Step 1

Login into blogger dashboard and Go to layout at left panel than click on add a gadget link as shown in below picture.
How To Disable Right Click on BlogSpot

Step 2

When you click Add a Gadget link a popup window will open with all gadgets list. Please choose HTML/JavaScript gadget form list as shown in below picture.
How To Disable Right Click on Blogger

Step 3

Past below code just inside it:
<script language=JavaScript>
<!--
//Disable right mouse click Script
var message="Function Disabled!";
///////////////////////////////////
function clickIE4(){
if (event.button==2){
alert(message);
return false;
}
}
function clickNS4(e){
if (document.layers||document.getElementById&&!document.all){
if (e.which==2||e.which==3){
alert(message);
return false;
}
}
}
if (document.layers){
document.captureEvents(Event.MOUSEDOWN);
document.onmousedown=clickNS4;
}
else if (document.all&&!document.getElementById){
document.onmousedown=clickIE4;
}
document.oncontextmenu=new Function("alert(message);return false")
// -->
</script>     Save and reload your blog

Monday, 12 May 2014

Popup Facebook Like Box For Blogger


Pop Up Facebook Like Box
It has been dream of every blogger to be successful in his career but not everyone is successful in blogging. Some push up their hard work and don't loose hope while others leave the ground. Well, Blogging is never ending game, it will grow up more and more! Blogging success appears with several things such as you'll be getting high traffic, earning increases, fans and followers increases, being popular and people also talk about you and your blog. Well, having high number of social followers is great as it help you to drive quick traffic, finding out the average of your followers and also knowing more about them.

No doubt, you may have created Facebook fan page of your blog. But what about page likes? Are they increasing, decreasing or no movement? Well, Most of the new blogs have very less likes as the page doesn't reach to the high audience. It's recommended to use some type of Facebook like boxes in our blogs to increase likes and also converting blog visitors into Facebook fans. Out there, many type of widgets are available for Blogger but today I'm gonna share something special widget that is named as "Popup Facebook Like Box". So, let's discuss about this widget more.

Facebook Pop up Like Box For Blogger

This is an amazing and magical Facebook pop up like box specially for Blogger blogs that will help you to increases Facebook page likes of your blog rapidly. The name of this widget itself proves that when someone enters into your blog while loading page, page gets dark transparent background and this widget appears in order to ask the user for liking your page. This widget will work in every webpage of your blog. 
Don't get worried if you're thinking about readers will get annoyed. This like box is designed and developed differently. When this widget appears, it throws a cookie into the user's operating system which helps this widget to control its appearance. Means through the use of that cookie it will not annoy readers by coming again and again. So, it only appears once to the visitors. But yes, if someone clears cookies than it might come back but only for one time because it will again send cookie into visitor's system.
After the great functions of this widget, it also has cute look in design. It appears with a loving effect and the whole box has also cool design. First, it has an title "can also be called message" which appears at the top center. That title or message forces visitors to like your page. Second, It has the main thing "Like Box" that is actually official Facebook like box. At third and last, There is a close button that is a way to go to your blog by closing that Pop Up like box.

How To Add Facebook Pop up Like Box in Blogger?

  • Go To Blogger >> Layout >> Add a Gadget
  • Choose HTML/JavaScript
  • Paste The Following Code in Content Box
<script src="http://yourjavascript.com/69231961363/jquery-colorbox-min.js"></script><script src='http://ajax.googleapis.com/ajax/libs/jquery/1.4.4/jquery.min.js' type='text/javascript'></script>
<script type="text/javascript">
jQuery(document).ready(function(){
if (document.cookie.indexOf('visited=true') == -1)
{
var fifteenDays = 1000*60*60*24*30;
var expires = new Date((new Date()).valueOf() + fifteenDays);
document.cookie = "visited=true;expires=" + expires.toUTCString();
$.colorbox({width:"400px", inline:true, href:"#exestylepopups"});
}
});
</script>
<style type="text/css">
/*
ColorBox v1.3.16
(Copyright (c) 2011 Jack Moore - jack@colorpowered.com)
*/
#colorbox,#cboxOverlay,#cboxWrapper{position:absolute;top:0;left:0;z-index:9999;overflow:hidden}#cboxOverlay{position:fixed;width:100%;height:100%}#cboxMiddleLeft,#cboxBottomLeft{clear:left}#cboxContent{position:relative}#cboxLoadedContent{overflow:auto}#cboxTitle{margin:0}#cboxLoadingOverlay,#cboxLoadingGraphic{position:absolute;top:0;left:0;width:100%}#cboxPrevious,#cboxNext,#cboxClose,#cboxSlideshow{cursor:pointer}.cboxPhoto{float:left;margin:auto;border:0;display:block}.cboxIframe{width:100%;height:100%;display:block;border:0}#cboxOverlay{background:#000;opacity:0.5 !important}#colorbox{box-shadow:0 0 15px rgba(0,0,0,0.4);-moz-box-shadow:0 0 15px rgba(0,0,0,0.4);-webkit-box-shadow:0 0 15px rgba(0,0,0,0.4)}#cboxTopLeft{width:14px;height:14px;background:url(https://blogger.googleusercontent.com/img/b/R29vZ2xl/AVvXsEiTlAKR0bx7uyjzrLVOPal7FuZOfSV-u0QLDI2MF6fGhvflWp_1yBhTJ20ImTCO8mD5W1n49dd-P8W1ey0q3aBx6p2uv4Dry12G3Sy9VLTOU_f2oKFEtsqJyz5s72XvLq7za0A0x-vMgRQ/s1600/controls.png) no-repeat 0 0}#cboxTopCenter{height:14px;background:url(https://blogger.googleusercontent.com/img/b/R29vZ2xl/AVvXsEgcdOgbxerogC4VSBDRRrG3u6VJPBPN3nsmMxDw60kkRFXopXRXRXewlGoTCCFasBQOpFddVW_cfKLBrj11h2lMH3sqS1KwpolCQDSPHsxAcO78NS1VzO3_oRDvWWKxvk7Qx_AvkWK1fPI/s400/border.png) repeat-x top left}#cboxTopRight{width:14px;height:14px;background:url(https://blogger.googleusercontent.com/img/b/R29vZ2xl/AVvXsEiTlAKR0bx7uyjzrLVOPal7FuZOfSV-u0QLDI2MF6fGhvflWp_1yBhTJ20ImTCO8mD5W1n49dd-P8W1ey0q3aBx6p2uv4Dry12G3Sy9VLTOU_f2oKFEtsqJyz5s72XvLq7za0A0x-vMgRQ/s1600/controls.png) no-repeat -36px 0}#cboxBottomLeft{width:14px;height:43px;background:url(https://blogger.googleusercontent.com/img/b/R29vZ2xl/AVvXsEiTlAKR0bx7uyjzrLVOPal7FuZOfSV-u0QLDI2MF6fGhvflWp_1yBhTJ20ImTCO8mD5W1n49dd-P8W1ey0q3aBx6p2uv4Dry12G3Sy9VLTOU_f2oKFEtsqJyz5s72XvLq7za0A0x-vMgRQ/s1600/controls.png) no-repeat 0 -32px}#cboxBottomCenter{height:43px;background:url(https://blogger.googleusercontent.com/img/b/R29vZ2xl/AVvXsEgcdOgbxerogC4VSBDRRrG3u6VJPBPN3nsmMxDw60kkRFXopXRXRXewlGoTCCFasBQOpFddVW_cfKLBrj11h2lMH3sqS1KwpolCQDSPHsxAcO78NS1VzO3_oRDvWWKxvk7Qx_AvkWK1fPI/s400/border.png) repeat-x bottom left}#cboxBottomRight{width:14px;height:43px;background:url(https://blogger.googleusercontent.com/img/b/R29vZ2xl/AVvXsEiTlAKR0bx7uyjzrLVOPal7FuZOfSV-u0QLDI2MF6fGhvflWp_1yBhTJ20ImTCO8mD5W1n49dd-P8W1ey0q3aBx6p2uv4Dry12G3Sy9VLTOU_f2oKFEtsqJyz5s72XvLq7za0A0x-vMgRQ/s1600/controls.png) no-repeat -36px -32px}#cboxMiddleLeft{width:14px;background:url(https://blogger.googleusercontent.com/img/b/R29vZ2xl/AVvXsEiTlAKR0bx7uyjzrLVOPal7FuZOfSV-u0QLDI2MF6fGhvflWp_1yBhTJ20ImTCO8mD5W1n49dd-P8W1ey0q3aBx6p2uv4Dry12G3Sy9VLTOU_f2oKFEtsqJyz5s72XvLq7za0A0x-vMgRQ/s1600/controls.png) repeat-y -175px 0}#cboxMiddleRight{width:14px;background:url(https://blogger.googleusercontent.com/img/b/R29vZ2xl/AVvXsEiTlAKR0bx7uyjzrLVOPal7FuZOfSV-u0QLDI2MF6fGhvflWp_1yBhTJ20ImTCO8mD5W1n49dd-P8W1ey0q3aBx6p2uv4Dry12G3Sy9VLTOU_f2oKFEtsqJyz5s72XvLq7za0A0x-vMgRQ/s1600/controls.png) repeat-y -211px 0}#cboxContent{background:#fff;overflow:visible}#cboxLoadedContent{margin-bottom:5px}#cboxLoadingOverlay{background:url(https://blogger.googleusercontent.com/img/b/R29vZ2xl/AVvXsEhX9r4C8xuR82RRpqWOpKyohuEmo614aF7M7yDxeFERfs7gVIrBhw6k_I3sR7YiytoV8Pq9xDnmBxhqhtJuMtOR02fSIaMPJ26jTwCsZ_G-xK4yc977jeB8fFjiEzkVHa-I37okOH3888w/s400/loadingbackground.png) no-repeat center center}#cboxLoadingGraphic{https://blogger.googleusercontent.com/img/b/R29vZ2xl/AVvXsEjz_5AjokcPlm9gfnphJH2y8_HhQ47PxjzYRmx1Nq1l9KVP0FyNTwQFTEGbdEIrf1S6zHyN_1YCtnttkdxYT9M-RV2Ifnaj_gtFGF3imMNALqoCg3HLn9-M6_Rr63o_yjBt4tnwMLduK64/s400/loading.gif) no-repeat center center}#cboxTitle{position:absolute;bottom:-25px;left:0;text-align:center;width:100%;font-weight:bold;color:#7C7C7C}#cboxCurrent{position:absolute;bottom:-25px;left:58px;font-weight:bold;color:#7C7C7C}#cboxPrevious,#cboxNext,#cboxClose,#cboxSlideshow{position:absolute;bottom:-29px;background:url(https://blogger.googleusercontent.com/img/b/R29vZ2xl/AVvXsEiTlAKR0bx7uyjzrLVOPal7FuZOfSV-u0QLDI2MF6fGhvflWp_1yBhTJ20ImTCO8mD5W1n49dd-P8W1ey0q3aBx6p2uv4Dry12G3Sy9VLTOU_f2oKFEtsqJyz5s72XvLq7za0A0x-vMgRQ/s1600/controls.png) no-repeat 0px 0px;width:23px;height:23px;text-indent:-9999px}#cboxPrevious{left:0px;background-position:-51px -25px}#cboxPrevious.hover{background-position:-51px 0px}#cboxNext{left:27px;background-position:-75px -25px}#cboxNext.hover{background-position:-75px 0px}#cboxClose{right:0;background-position:-100px -25px}#cboxClose.hover{background-position:-100px 0px}.cboxSlideshow_on #cboxSlideshow{background-position:-125px 0px;right:27px}.cboxSlideshow_on #cboxSlideshow.hover{background-position:-150px 0px}.cboxSlideshow_off #cboxSlideshow{background-position:-150px -25px;right:27px}.cboxSlideshow_off #cboxSlideshow.hover{background-position:-125px 0px}#mdfb{font:12px/1.2 Arial,Helvetica,san-serif;color:#666}#mdfb a,#mdfb a:hover,#mdfb a:visited{text-decoration:none}.mdbox-title{background:#000;color:#fff;font-size:20px !important;font-weight:bold;margin:10px 0;border:20px solid #ddd;-moz-border-radius:6px;-webkit-border-radius:6px;border-radius:6px;box-shadow:5px 5px 5px #CCC;padding:10px;line-height:25px;font-family:arial !important}
</style>
<div style='display:none'>
<div id='exestylepopups' style='padding:10px; background:#fff;'>
<center><h3 class="mdbox-title">Receive all updates via Facebook. Just Click the Like Button Below...</h3></center><center>
<iframe src="//www.facebook.com/plugins/likebox.php?href=http%3A%2F%2Fwww.facebook.com%2FBloggerYard&amp;width&amp;height=258&amp;colorscheme=light&amp;show_faces=true&amp;header=false&amp;stream=false&amp;show_border=false&amp;appId=148912718614218" scrolling="no" frameborder="0" style="border:none; overflow:hidden; height:258px;" allowtransparency="true"></iframe>
</center>
<!--Please Do not Remove the Credits -->
    <p style=" float:right;  margin-right:35px;  font-size:9px;" >Provided By <a style=" font-size:9px; color:#3B78CD; text-decoration:none;" href="http://www.bloggeryard.com/">Blogger Yard</a></p>
</div></div>
  • Replace BloggerYard With Your Facebook Fan Page Username
  • Leave The Title Box Empty!
  • Click Save!

Saturday, 10 May 2014

How To Point Website Subdomain To Blogger Blog Godaddy

Good news, the domain ownership verification system has been modified to use shorter string, allowing it to work with the limited 1and1.com DNS system.

Update: If you have a domain with GoDaddy, follow these instructions: http://blog.mridey.com/2013/06/how-to-setup-your-blogger-blog-with.html

Here's how to setup your 1and1.com domain for Blogger.

Step 1: Get the Blogger settings

- Go to the basic settings of your blog in the Blogger UI.


- Click the "Add a custom domain" link

- Click the "Switch to advanced settings" link
- Enter the subdomain and domain you would like your blog to use. In my case, I purchased domain "bloggeronline.info" and choose to have my blog use "blog.bloggeronline.info". Note that you need to specify a subdomain like "blog" or "www" with your domain name. Then press "Save". It will fail with "Error 12". This is expected.
You will now see two lines displayed that need to be configured on the 1and1 website.
In my case the two lines are:
blog, ghs.goog.com
mf3relchxuxx, gv-kgyql46c766bxw.dv.googlehosted.com
The first line is always the same for everyone, the second line is specific to your own blog and your own account so don't copy my example, it won't work.
Step 2: Go to 1and1.com dashboard
- Go to the 1and1.com website, login, go to domain management
- Click the checkbox on your domain and select DNS -> Edit DNS Settings
Select DNS, Other IP address and enter 216.239.32.21 and press OK and go back to the 1and1 Overview dashboard.
- Back on the dashboard, click New->Create subdomain
Enter "blog" (or www, or any other string you want for your blog, press OK and go back to the 1and1 Overview dashboard.
- Click the checkbox on that new subdomain, select DNS->Edit DNS settings

Select CNAME, enter "ghs.google.com", press OK and go back to the 1and1 Overview dashboard.

- Back on the dashboard, click New -> Create subdomain again

Enter the first element of the second line we saved in the Blogger settings, mine was "mf3relchxuxx", yours will be different. Press OK and go back to the 1and1 Overview dashboard.


- Click the checkbox on that second new subdomain, select DNS->Edit DNS settings

Select CNAME, enter the second section of the second line. Mine is "gv-kgyql46c766bxw.dv.googlehosted.com", yours will be different. Press OK and go back to the 1and1 Overview dashboard.

- Now you should have two subdomains and one domain listed in your dashboard, something like:
Step 3: Wait and wait ...
We need the new settings entered in 1and1.com to be public and visible to Google. This can take up to 48h although usually it's more like 3h.
Step 4: Return to Blogger and apply the custom domain again.
- Go through the steps listed in Step 1. If the domain has been registered correctly, you should no longer get an "Error 12" but instead your domain should be accepted and this screen appear:
- Click the edit link
Make sure you click the "Redirect" checkbox and press Save again. This will make your naked domain (bloggeronline.info in my case) also work for your blog.
This is brand new so if you have problems, please let me know.
Please remember to +1 my post, and reshare it on Google+, Facebook or Twitter,
  • How to register a domain name for blogger?
  • How to register a subdomain name for blogger?
  • How to redirect naked domain (i.e, domain without www) to your domain name (i.e, domain with www)?…
Before registering domain name for blogger, you have to buy a domain name or use Google app to buy it. This tutorial is intended for those who already bought the domain name.
If you purchased a domain name already, follow given steps.
  • First login to your blogger account and select your blog, go to Settings tab.
  • Under the publishing menu, your blog address would be there. Then click on add custom domain

  • Enter your domain name. You can use www or subdomain
  • You can buy a domain name from blogger or point your custom domain to the blog. For the second option (we are doing this option), click on Switch to advanced setting. Here we can enter our domain name (Example: www.yourdomainname.com), you can use a Subdomain also here(Example: foo.mydomain.com).
  • Then Save.
Update: There is a possible situation here, A warning appears “Another blog or Google Site is already using this address.”. It’s because some had used this domain in the past. So you have to reclaim it. For that click on Settings instructions.  It will show necessary instructions to verifying the domain name. The steps for both reclaiming and new registrations are same (Please follow below steps, we have to add two CNAME Records).
  • Two CNAME records have to be added to your domain host. First is to ghs.google.com and second one is some long text ending with domainverify.googlehosted.com. Note down both, second one used for verifying your domain and first one is used for pointing.

Two CNAME Records, note down it
  • Next is DNS Management in your domain hosting website. Go to Bigrock.com (or your hosting website) >>> Login to your account >>> Domain >>> List all orders. Click on your domain name.
  • Select Domain management. Click on CNAME Records. Add CNAME Record. Enter www as Host name. ghs.google.com as Value
  • Again repeat the step for second CNAME from the Blogger window which is ending with domainverify.googlehosted.com(I can’t list it here because this is different for all users).
  • Go back to Blogger windows and click Save.

This part explains how to redirect naked domain(without www) to top level domain name(with www).

  • Next select A Records. Click on Add A Record. Leave blank for Host Name. Add following IP addresses one by one to Destination IPv4 Address(i.e, you have to add 4 A Records).
IP Addresses :216.239.32.21
216.239.34.21
216.239.36.21
216.239.38.21
Everything is OK now,  wait for sometime. It may take couple of hours to spread your domain name across the web.
- See more at: http://bloggerhow.com/blogger/how-to-register-a-domain-or-sub-domain-name-for-blogger-redirect-naked-domain/#sthash.ysqiedIC.dpuf

Saturday, 15 February 2014

Create a Bulk SMS Website by P & N SMS


Bulk SmsService


We can design Professional White Label Bulk SMS Website for you either as a stand alone website or integrated to your other business or even an upgrade of your prior web design. In addition to the Basic bulk SMS features, optional we can add more functions such as billing system, helpdesk and ticket, live chat, blog, forum and many more as per request and at additional charges.

Thursday, 24 October 2013

Get A Mobile Friendly Responsive Website Version


P & N Mobile App Responsive Web Template" is suitable for website page, single web page or quick portfolio page. don't let your visitors to waste their data on your site, create a mobile site now, Get Started!

Are you browsing on Desktop, Tabs or mobile devices? Whatever you are browsing, P & N App Responsive template fits well.
This template is designed for maximum readability using good color contrast and typography. Proper use of shadow and effects applied using CSS3.
This template comes with a nice Documentation and necessery PSD files. You can easily customize it to fit your goal.

Click here to Continue

Monday, 23 September 2013

What I learned from Google AdSense

In 2006, I was university student and relying on family income. It was hard to struggle for me. When I knew that there was an opportunity for student to earn some pocket money, then I rushed to gain knowledge. As a student it was easy to manage some extra time for online works. At the very beginning it was very complicated to understand and there was little bit confidence over this online works. Even I was Master Degree student but unfortunately distant from technology. However, I tried it and started to works online. At the starting period I created a blog and published many blog posts regularly. At that time I needed some money to run my daily life and was working for pocket money. My blogging mission was targeted to join on Google AdSense and convert blog traffic into money. In the initial period, it was easy to access over Google AdSense. A simple blog with few articles could get chances to approve and they could places texts and images ads to their blogs or websites. But, now, it is extremely knotty to get Google AdSense approve due to several reasons.


People thought that Google AdSense is money printing machine and it can print billions of Dollars at overnight and distribute. It is wrong concept of common people who see dreams to make money from AdSense without any knowledge. Google AdSense is one of the best platforms for PPC ads and makes money by placing contextual ads on blogs or websites. There are many alternative of Google AdSense, still, Google AdSense is highly trustworthy. Every newbie make some common mistake and their AdSense account disable quickly. Because of, most of the newbie see dream to make lots of money at overnight and ignore the AdSense policies (Terms and Conditions). One AdSense research study revealed that at least 82 percent newbie (new bloggers and websites publishers) make these common mistake and they get frustration over AdSense. One anther online survey shows that at least 68 percent newbie are ignorant from AdSense Policy.


Must Read: How to earn Google Money – GAU Research

Yes, Google AdSense is a big dream of many people and they want their dream come true. It can be possible but all we should be acquainted with that; AdSense is all about policy and our every activities surveillance by AdSense Team. Google Robot and human team works together to scrutinize their ads publisher’s activities and if they found any mistake then they take instant action over violation of Terms and Conditions. Everyday thousands of AdSense accounts have been disabling due to the violation of AdSense Policy and losing their earned amount also.       
   
Must Read: How To Earn $500 per moth

Positive Points (What to Do):

Google AdSense is all about Traffic: It is common truth that Google AdSense is all about Traffic and converts into revenue. It means more traffic attracts more revenue and vice versa. However, low traffic generators also have been relying on AdSense earning. Each click and page-view increases the AdSense revenue account and motivates to work hard. Therefore, huge number of traffic is plus point to earn more money from AdSense and upgrade their lifestyle. There are some millionaires are generating millions of traffic to their site and establishing their online business. One click can generate $ 0.15 to $ 5 and per 1000 pages views generates $3 to $5; it depends upon niche blogs or websites. If a blog or website can generate 10000 Pageviews per day then it can easily generate minimum $300 without counting any click on ads. If a blog gets 100 clicks on ads per day then it can generate $ 450 to $1.5k per month. As a result, if you want to make money while sleeping, then you have to do struggle for traffic and Learn SEO ideas. You can drive targeted traffic to your blogs and websites and earn targeted earning.


Original Contents stuff: Google AdSense has been taking the duplicate contents issues, very seriously and rejecting those blogs with filling duplicate contents. It is becoming sober due to the copyright issues issue. Original contents get high priority and AdSense add plus points over it. A blog with original and fresh contents get quick opportunity to approve Google AdSense account. If your blog has 20-25 original contents with freshness, it will be easy to get quick access over AdSense account and starts to make money. In last 5 years, I asked many AdSense disabled account holders that, why they were getting disable their account and the reasons was simple – publishing duplicate contents and publishing ads without contents. Yes, 65 percent AdSense account disable due to the original content matter. Therefore, one thing listen to me, if you want to make more money from AdSense in the long-term; forget everything and focus your all time for publishing original contents. 

Targeted niche: Google AdSense earning depends upon your niche contents. There are several niche blogs contents and getting ads PPC rate varies according to the niche contents. Technology, Banking, finance, Insurance, Laws, Health – weight loss, Business, education related blogs contents getting high PPC rate compare with Entertainment, online dating, gaming, forums related niche contents. Therefore, you need to target your blogs content with specific niche and concentrate your mind over it. While selecting any niche topics, you should be clear on your personal skills (technical, academics, experience and resources availability).
If you are IT related person then it will be easy to handle all technological contents, however, IT related persons can not handle the law related contents. The highest Pay per click keywords comes from Laws (up to $450 per click), Banking & Finance and automobile related contents. Google shows the relevant ads on specific niche contents and helps to generate more revenues. Suppose if your content is related to Samsung Galaxy S5 Review, then Ads shows related Samsung galaxy and if your content related to Nokia Lumia 1020 then ads shows about Galaxy or windows. There is a high chance to get more clicks on related ads.  

Organic Traffic: Google AdSense always avoids the software or spasm boat traffic and it is against of AdSense policy. Newbie are not aware from it and they drive traffic from unethical ways. They get their account instantly disable due to the violation to TC. Search engine traffic, social media traffic or direct traffic can help to keep your AdSense account long-time and make money unlimited. You have to learn how to grow your blog organic ways and empower it on search engines. Once you able to ranking your blog on search engines, it will really drive targeted visitors to your sites and helps to generate more clicks on ads.


Regular Update: Google AdSense also love regular updated blogs and shows the contextual ads according to timeline of contents. Therefore, you have to update your blog per day basis. If you publish 1 blogpost per day, there will be 360 blogposts in a year. It will helpful to ranking your blog position on search engines and will get regular readers to your blogs. It’s hard to get readers those blogs which updates monthly, bimonthly or fortnightly. Regular readers always want new stuffs to your blogs and want more ideas from you. Therefore, you have to more engage to publish new content per day and make more readers.
Negative Points (What not To Do):

Invalid Click: it is common phenomenon that most of the AdSense account disabled due to the invalid click. I found that there are 74 percent account disable by invalid click. There is a strict rules that invalid click is against of Google TC and harmful for its advertisers. Google AdSense always keeps its advertisers at the safe mode and chucks the ads publishers who work against of its policy. One invalid click may harmful to breach the deal between Google and its advertisers. Therefore, you   should never tell your friends, relatives and readers to click on ads or increase impression to your blog.

Invalid Impression: it is also a common issue that many newbie try to increase their pageviews impression for make money over-nightly. It is completely wrong ways to make money from AdSense. Yes you can increase your pages view per day by doing creative works like ranking your blogpost on search engines, linking your blogpost on internal pages. But more impression from one IP address is not valid. Therefore, you should not try to increase page views impression by yourself. Your every activity will underway of observation from Google Teams. Your Ads id and your IP Address will be scrutinized.

Spam Boat Traffic: You have to faraway from spam boat traffic to your blogs. It is totally against of AdSense policy and gets quick disable your account. There are many software drive traffic, however, all these spam boat software are worthless for AdSense money makers. Therefore, do not use any software to increase your traffic and pageview impression. Your strategy should be organic.

Duplicate Content: It is the negative point for AdSense earners. Because of after the introducing of Google Panda and Penguin, critical situation stand there for duplicate content publishers. All duplicate content will be punishable and valueless. It kills your time and self creation. Some years before, Google had not cared after the duplicate contents and approved AdSense account without any review. In these days, AdSense setup its strict rule for AdSense approval and may remove ads links from your sites, if it found that content is duplicate. Thus, take much more time to write original and fresh contents. It helps to grow your blog instantly and increase traffic also. Before approving any AdSense application, Google strongly reviews the blogs and websites. 30 to 35 percent blogs AdSense accounts disable due to the reasons of duplicate contents or copy past contents.    

Low Quality contents: We know that content is a king of any blog or website. Therefore, low quality content get less values on search engines as well as the view of readers. You have to write contents with including some research base data, images, videos, infographic visualization; maps etc. and make your content more conversational. Low quality content is the negative point and diminishes the value to your blogs.

Few contents: Yes, It is also negative points and hard to drive huge number of traffic for few contents. Google never approve an account with few contents like only 10 or 15 contents. Thus, you have to publish more contents to get quick AdSense approval and generate more traffic to your blogs. More traffic helps to generate more money from AdSense.

Ads on empty pages: do not place Google ads on empty pages. Time has changed and Google has also modified a rule that placing the ads on empty pages is against of AdSense policy. You have to remove Google ads links from your empty pages, if you ignore this one. One day your account definitely disable.

Finally, Google AdSense is the best place to make money online and make a life happier. There are many alternative of Google AdSense, however every blogger and web publishers eager to work with Google. Google is also a high Paying contextual ads programs and highly trustworthy. Many blogger do not believe on other ads networks and wait for long time to get chance for AdSense approval. All bloggers should completely aware from AdSense policy and should understand that what to do or what not to do. You should not worry that whether you earn or not but worry about violation of AdSense policy. Make sure that you are following AdSense policy on the right way.
Powered By Web-Maker